Procedure to install NetSim in Microsoft Windows

Note for download: Chromium based browsers (Chrome, Edge to name a few) have stopped support for FTP protocol. Please use any non-chromium based browser like Internet Explorer or Firefox to download any software from this page.

System requirements:

  • Hardware: Processor: i3 equivalent or above, RAM: 2GB(min) 4GB or higher(recommended)
  • Windows 7(SP1), 8, 8.1 or 10 (32bit / 64bit) operating system with minimum 1024 * 768 monitor resolution
  • Disk Space: Minimum 500 MB
  • Microsoft Office 2007 or higher version (required to view packet trace, event trace and exported results which are ‘,’ separated csv files.
  • Microsoft Visual Studio 2015 (necessary if user want to work with the protocol C source codes)
  • The systems must be networked via LAN and should be able to ping the NetSim license server

The procedure below explain how to installation NetSim in Microsoft Windows 7/8/10 Operating System. The NetSim software is available for download from CC ftp site. To download NetSim V10.2 Click Here, NetSim V11 32bit Click Here, NetSim V11 64bit Click Here, NetSim Academic V11.1 32bit Click Here, NetSim Academic V11.1 64bit Click Here, NetSim Standard V11.1 32bit Click Here, NetSim Standard V11.1 64bit Click Here, NetSim Standard C13.0.29 64bit Click Here

Extract the zipped file of NetSim to Local Drive (e.g. "D:\") and run the setup from the extracted folder.


Note:

If you have a project created in version 10.2, please use the version 10.2 only (do not install version 11) as there could be compatibility issues. Once you are done with files created on version 10.2, you may remove it and install version 11.
You may create new projects on version 11.


Installation:

NetSim Software setup is available as 32 and 64 bit builds. Based on the operating system installed users can install 32 bit build of NetSim in for 32 bit operating systems and either 32/64 bit builds of NetSim in 64 bit operating systems. The software can be installed manually via GUI or silently via CLI based on user preference.
1. Manual

  1. Double click on NetSim setup (.exe) to start the installation process.
  2. Click on ok, Next, I Agree, Install, Finish whenever prompted for, and no customization during the process is required.
  3. Installation of NetSim and associated third party tools will happen in the following order:
    1. NetSim
    2. Wireshark
    3. WinPcap
    4. Microsoft Visual C++ 2015 Redistributable
    5. SUMO
    6. Python 2.7.6
    7. Pywin32
  4. At the end of Installation, Double click on the NetSim shortcut created in the desktop to start NetSim. Installation can be considered successful if the following window asking for License server IP address opens as shown below.

2. Silent

  1. Open command prompt and change current directory to the path where NetSim software setup (.exe) is present.
  2. To the exe pass run time arguments /S and /silent=1 as illustrated below:

       NetSim installation along with the associated third party tools may take up to 10 minutes.

  1. Once NetSim shortcut is created in the desktop, right click on it and select open file location which will take you to <NetSim Install Directory>\bin folder. Move to the previous directory <NetSim Install directory> and wait till uninstaller (uninst.exe) gets created.
  1. Double click on the NetSim shortcut created in the desktop to start NetSim. Installation can be considered successful if the following window asking for License server IP address opens as shown below.

Help and Support:


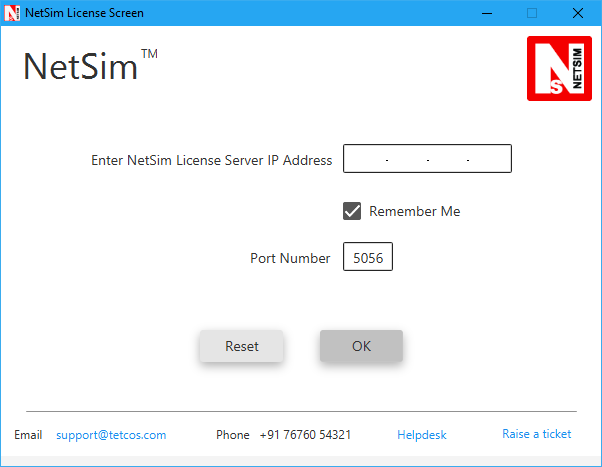
***To run NetSim, enter licence sever IP address as:  172.31.1.12 and Port Number as:  5056


© 2008, Computer Centre, IIT Kanpur All rights reserved.
This site maintained by Windows Labs Administrator
Suggestions and comments about this web site: gopesh@iitk.ac.in
This page was last modified: 12 February 2019 05:05 PM